I promised a tutorial and here it is. Christine asked me to do something for the newsletter this week over at All That Scraps. I designed this card just for that. I love the way this one turned out. Enjoy the eye candy. :)

You will need copper flashing (from your home improvement store), Spellbinders dies, Impressabilities, Wizard die cut machine, Copic E49 and airbrush system, nail sanding block

Lay your die cut side face up on your magnetic mat, place flashing face down on top of die. Place white cutting mat on top of sandwich and run through your Wizard.

It will look like this when cut.
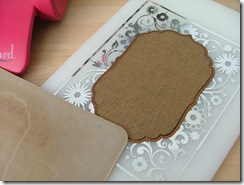
Lay your die with the flashing still in it on top of your Impressability. Make sure the cut side is up. Layer rubber mat and white cut mat on top of that and run through your Wizard.

Your metal piece will have the impression of your Impressability embedded in the metal.

Airbrush metal piece with your E49 copic marker and your airbrush system. It will look like this when finished airbrushing.

Sand with your nail sanding block.

This is what the finished piece should look like. Assemble your card. This is an easy way to get a super wow on your project.

Have a great day and enjoy the possibilities!
P.S. You can click on any of these pics to view them larger.
Supplies:
Stamps: C.C. Designs Sweet Kiki LaRue
Spellbinders: Labels Four S4-190, Petite Ovals, Large S4-138,
Impressabilities Flowers I2-1004, Classic Scalloped Heart S4-137, Floral Accents S4-199
Paper: Cosmo Cricket Early Bird: Farmers Market, PTI white, brown cs
Copics: YR0000, E00, BG10, BG11, BG72, BG75, BG78, R0000, R89, E25, E27, E30, E31, airbrush system , E49
wide satin ribbon, sewing machine, brown thread, sanding block, brads, brown ink, sponge, Wizard die cut system, button, crochet thread
 I am all about the real meaning of Christmas and Diane created this gorgeous Christmas set for the new ATS release. It is called Reason for the Season. There are seven stamps in the set and it will sell for $13.00. It is one of many that will be released on Monday, Oct 5th at 10:00 pm EST. Follow the link here<---- to see more of this set and to enter to it. :) Have a great night and enjoy the possibilities!


 paper: PTI kraft, PTI white, random metallic cardstock, Core`dinations vintage collection